Quick verdict: the NexStar 130SLT is best for beginners who want computerized object finding and a bright 130mm reflector without jumping to the cost or bulk of a bigger GoTo system.
Best reasons to buy
- 130mm aperture shows brighter clusters, nebulae, and galaxies than small beginner refractors.
- Computerized GoTo makes finding targets easier for new observers.
- Compact tube and mount are easier to move than a large Dobsonian.
- Strong value if you want tracking and object finding in one beginner package.
Watch outs
- Needs occasional collimation because it is a reflector.
- Alt-az mount is not a serious long-exposure deep-sky astrophotography platform.
- Tripod and plastic parts feel entry-level compared with premium GoTo scopes.
- Alignment must be redone after rebooting or bumping the mount.
Buy the 130SLT for visual observing and simple Moon/planet imaging, not as a shortcut to long-exposure galaxy photography.
The Celestron NexStar 130SLT is a computerized Newtonian reflector with a 130mm aperture and SkyAlign GoTo mount, making it one of the best value computerized telescopes for beginners who want to find deep-sky objects without star charts. It delivers bright, detailed views of planets, nebulae, and galaxies at a mid-range price point.
- Beginner-Friendly - The Celestron NexStar 130 SLT is designed specifically for novice astronomers.
- Computerized Mount - Its advanced mount allows for easy tracking of celestial objects.
- Good Optical Performance - The 130mm aperture provides clear and bright images of various astronomical objects.
- Affordable Price - Offers great value for those entering the world of astronomy.
🌌 Want More Stargazing Tips?
Join 900+ astronomers. Weekly sky guides, no spam.
Celestron NexStar 130 SLT is a reflector telescope built on a computerized mount, which is helpful with finding objects in the night sky and automatically tracking and keeping them at the center of your eyepiece.
Celestron NexStar 130 SLT is a very popular telescope amongst beginners. It is built on a computerized mount, which is helpful with finding objects in the night sky- a great feature if you are a beginner and don’t know anything about astronomy yet.
Another great thing is that Celestron is one of the top telescope manufacturers in the world, so you can’t go wrong here. The customer service is amazing, and the build quality is very high.
In this article, I’ll share the specifications of this telescope, its advantages and disadvantages, how to set it up, its optical performance, if you can use it for astrography, and much more.
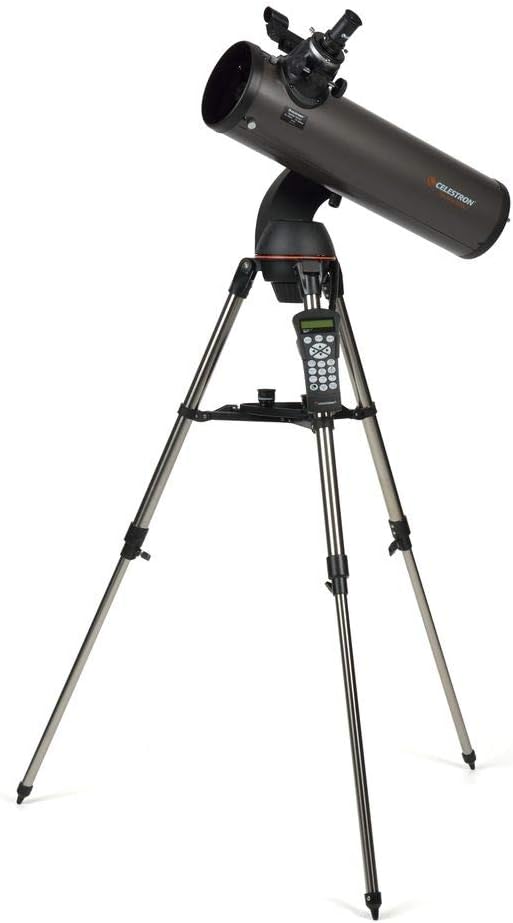
Celestron NexStar 130SLT
Full GoTo tracking at a beginner-friendly price. 130mm reflector pulls in surprising detail on planets and star clusters.
Buy at High Point →Specifications of the Celestron NexStar 130 SLT telescope
After setting up the NexStar 130SLT, let it cool down for 20-30 minutes outdoors before observing. The mirrors need to reach thermal equilibrium with the ambient air for the sharpest views, especially at higher magnifications.
Celestron NexStar 130 SLT is a Newtonian Reflector with two mirrors. One is a small secondary mirror at the front of the optical tube mounted on a spider mount.
Reflectors use mirrors to produce images and are cheaper to manufacture than lenses in refracting telescopes. Because of that, you will always get a much better performance for the money when you buy a reflecting telescope like this one.
Read also: Reflector vs Refractor Telescope: Which One Do You Need?
It is tilted 45 degrees to reflect the light from the primary mirror at the back to the eyepiece. The diameter of the primary mirror in the Celestron NexStar 130 SLT is 130mm, as you can see in the telescope’s name.
It is a high-quality multicoated parabolic mirror providing excellent and crisp images. The diameter (aperture) of 130mm delivers 30% more light-gathering power than the 114mm mirror used in smaller Celestron models.
The focal length of this telescope is 650mm. Focal length is the distance from the primary mirror to the focal point in the focuser. The focal length and aperture size translates to a fast F/5 (divide 650 by 130) telescope.
Being a “fast” telescope means it’s fantastic for faint objects like nebulae or galaxies. If your telescope is slow like F10, it will not perform as well as F5 on fainter objects, and you will see fewer details.
It has a resolution limit of 0.9 arcseconds. Think of resolution limit or resolving power as the ability of a telescope to resolve the difference between two point sources enough for you to see the difference. Basically, it’s a measure of how much detail you see.
Let’s take a look at the list of all specifications of Celestron NexStar 130 SLT:
- Type: Newtonian Reflector
- Aperture: 130mm (5.12″)
- Focal Length: 650mm (26″)
- Focal Ratio: F5
- Finderscope: StarPointer – Red Dot Finder
- Eyepieces: 25mm and 9mm
- Optical Tube: Aluminum
- Mount: Computerized AZ Single Fork Arm with 40,000 celestial objects
Read also: Maksutov Newtonian Telescopes (In-depth Guide)
Old vs. new Celestron NexStar 130 SLT
If you’re eagle-eyed, you’ll observe that there are two iterations of the Celestron NexStar 130 SLT telescope on the market. You can come across both when you are looking to buy one but don’t panic.
They are the same; the primary difference is in the hand controller. The newer version has different descriptions on the buttons.
For example, number 1 on the old keypad had M representing the Messier Catalog, but “Solar System” is on the new keypad.
What I like about the newer hand controller is that the buttons are shaped for a feel.
The ability to feel each button is a massive advantage at night when you are trying to control the telescope in the dark, and you can feel different shapes of the buttons, so you don’t accidentally press the wrong button.
For example, the arrow buttons have little barriers on the sides. So when moving the telescope in the dark, you don’t have to worry about pressing enter or ESC accidentally. It has happened to me many times with the old controller.
Celestron NexStar 130 SLT telescope’s optical performance
When telescope manufacturers add a computerized mount to a budget-friendly telescope, they often make compromises that reduce the scope’s optical quality.
While it’s impossible to say that Celestron didn’t make any compromises, I can say the NexStar 130 SLT telescope surpassed my expectations.
For starters, its primary mirror is aluminum multi-coated. Whenever you see or hear the word “multi-coated” regarding telescopes, it means that at least the primary mirror has more than one layer of coatings.
Other optical elements may have also been coated multiple times, but you can’t be sure till you read the telescope manual or product description. Multiple layers of coatings massively reduce the amount of light lost to reflection in a telescope.
Reduced reflection means more light passes through the telescope. There’s no use having a 130mm aperture if you lose a bulk of the light-gathering ability to reflections in the optical elements.
A light-efficient telescope like the NexStar 130 SLT with a relatively large aperture and multi-coated surfaces will give you brighter views of night sky objects. Furthermore, the images will have higher contrast. You’ll be able to see more details.
You may suffer from coma occasionally. Coma aberration means your view is sharp in the center but blurry around the edge of your field of view.
As I’ve previously mentioned, the telescope suits deep sky objects viewing more than planetary observations. So, you’ll see crispier images when viewing faint objects, like fainter Messier objects than Saturn, for example.
The Celestron NexStar 130 SLT also has a limiting brightness magnitude of 13.1. That means the telescope cannot pick up any object duller than 13.1.
The good news is that most of the objects you’ll want to see will have brightness higher than this. The lower the number, the brighter the object.
Collimation
With reflecting telescopes, you always have to collimate. Collimation is a simple process of aligning the mirrors of the telescope. Poor collimation can result in blurry images or focusing problems.
Many people are scared of it but don’t be.
The telescopes come collimated from the factory, but sometimes the collimation is out due to vibrations during transit. So it is a good idea to examine the collimation before your first use.
You can buy a laser collimation tool that will do the job in seconds. All you have to do is to play with the adjustment knobs of the primary mirror.
The secondary mirror is rarely off, so I wouldn’t touch it if you don’t see any issues.
Included eyepieces and red dot finder
The telescope comes with a red dot finder. It is a small finder scope with no magnification that helps to locate the object in the sky. It has a small lens at the front and a little red LED light.
This LED is shining on the lens, making a small red dot in the middle of the lens. That’s why it’s called a red dot finder. It is a very common tool in telescopes in the lower class.
The first thing you have to do is to align it with the optical tube, so when you are looking through it, and the red dot is on the object, you want to see the same object in the eyepiece of the telescope.
I suggest you do it during the day before the stargazing night.
Just point it on the tree or something as a reference and adjust the LED dot with the small knobs until you see the same image in the finder and the eyepiece. It can be frustrating to align it at night, so don’t forget to do it earlier.
In my opinion, the small with the crosshair are better because they are actually small scopes that are more accurate. But the red dot finder will do the job, and you can always upgrade it later to a proper finderscope.
The Celestron NexStar 130 SLT comes with two Plossl eyepieces. The focal lengths are 25mm and 9mm, which gives you two magnifications. I’ll talk about the magnifications you get with these eyepieces later.
🔭 Want our top telescope picks for 2026?
Join 960+ astronomers getting weekly gear reviews, deals, and stargazing tips. Free.
Celestron NexStar 130 SLT telescope’s computerized mount
The computerized mount is an excellent feature on a telescope. You don’t have to spend time looking for objects manually. The only thing you have to do here is to press the button, and the telescope will automatically slew to the object.
The hand controller has over 40,000 objects in the database and the tour feature of the best current objects in the sky, so it is a pleasure to use it. This database is a big advantage of the computerized mount; beginners will enjoy it.
The computerized mount of the Celestron NexStar 130 SLT is easy to use, and you will learn how to operate it in a few sessions. Celestron also has a very informative guide in the box, so read it first.
Also, it might be a good idea to play with it during the day to get used to it.
The star alignment scares people off the computerized mounts, but you must do it before every stargazing session. It is a very easy process, as you’ll see soon.
However, you need to know the positions of the brightest stars in the sky. This you can easily find in any planetarium software or mobile app.
Celestron is using SkyAlign with three bright objects to align the telescope. You might struggle the first time, but you will learn it quickly. You can look at my AZ GoTo computerized guide article, where I explain the process in detail and mention tips on improving star alignment.
The mount uses 8 AA batteries that are not included (weird that one). The battery tray is conveniently placed in the arm of the mount.
This battery compartment is a nice feature because, for example, with the SkyWatcher model, you have a funny battery bag hanging off the telescope rather than an internal battery compartment.
You can also buy a separate 12V DC adapter if you are close to an electrical outlet. Otherwise, the batteries are enough for an outdoor session and last long. If you want to be safer, bring some spare ones with you.
Tripod
And now, the adjustable steel tripod of the Celestron NexStar 130 SLT. Some people complain that it is not sturdy and the telescope vibrates a lot. But I think that it is a good tripod for the price you are paying.
It has sturdy steel legs; the tripod is foldable and easy to transport and assemble. When touching the telescope, you will get some vibrations, but wait a few seconds, and the vibrations will stop.
To improve stability, I always hang something heavy in the middle to lower the center of gravity. Remember not to hang it on the middle holder tray legs because you will break it. Do it on the top, where the legs are joined to the top part of the mount.
It will greatly improve the stability and performance of the tripod. Another tip is to have the telescope at the lowest position possible. Don’t extend the legs if you don’t have to; the stability will be much better.
There’s also an accessory tray you can temporarily keep things. The tray gives you extra convenience. Rather than stooping low and turning to locate your accessories, you can easily pick an eyepiece or a Barlow lens from the tray.
What is the Celestron NexStar 130 SLT telescope’s magnification?
The Celestron NexStar 130 SLT has a maximum useful magnification power of 260X. The two eyepieces provided with the telescopes give it an effective magnification of 26X and 72X. A Barlow lens can take the magnification to 52X and 144X if needed.
The Celestron NexStar 130 SLT comes with two Plossl eyepieces. The focal lengths are 25mm and 9mm, which gives you two magnifications. With the 25mm eyepiece, you get 26x magnification; with the 9mm, you are looking at 72x magnification.
You have to upgrade the eyepiece collection if you want more magnification. Or you can use a Barlow lens that will double or triple the magnification provided with each eyepiece, but it will slightly decrease the quality of the image.
It is simple to calculate the magnification. You have to divide the telescope’s focal length by the focal length of the eyepiece you are currently using.
That’s why you get 26x magnification with the 25mm eyepiece. Just divide 650 by 25.
But don’t overdo it.
For every telescope, there is a maximum useful magnification, and the limit depends on the size of the aperture. In this case, with an aperture of 130mm, the maximum useful magnification is 260x.
To get that number, you multiply the size of the aperture by two (130×2=260). If you go over that, the image will be blurry, and you won’t be able to focus on the image.
Celestron SkyPortal WiFi module upgrade
This gadget is very cool. The Celestron SkyPortal WiFi Module upgrades your already amazing computerized mount. It is a small device that you plug into the AUX port of the mount, and it will create a personal WIFI network for you.
You can connect to that network with your smartphone or tablet. But first, you have to download the SkyPortal app for Android or iOS.
What it does is allow you to control the telescope wirelessly. The database contains over 100,000 objects, and the app’s interface is intuitive and user-friendly. You can also point your device to the sky and see a real-time projection of the objects in the sky.
Just tap on the object, and the telescope will point at it automatically. Watch the short video below to understand this better.
Another alternative is the NSOL telescope control software, which comes with the package. However, it’s a bit cumbersome. You should just get the WiFi Module since they both do the same thing.
How to set up and use the Celestron NexStar 130SLT?
To set up the Celestron NexStar 130SLT, you must first align the finderscope with the telescope. The next step is to supply your location details, date, and time. Lastly, you’ll need to use SkyAlign to align with three bright objects in the sky.
I’ve heard and seen people complain a lot about setting up the Celestron NexStar 130SLT, especially using SkyAlign. I won’t say it’s exactly straightforward. But I’ll say that it requires practice and some basic knowledge of spotting objects in the sky.
Attaching the tube assembly to the mount is straightforward. The NexStar 130SLT has a dovetail plate. All you need to do is slide the telescope into the clamping bracket. For the most part, you need no tools to couple the whole assembly.
Now, let’s talk about using the telescope. Firstly, you should align the finderscope to the telescope’s axis. Then add 8 AA batteries to the mount and power on the telescope.
Then do the following:
Enter requested details
You’ll need to enter the country and city you’re in. You’ll also be required to input the date and local time. You’ll enter all these through the numeric computerized hand control.
A piece of advice here: use your longitude and latitude to set your location rather than your country and city. The former will provide a better alignment and make your sessions more straightforward than using the latter.
Also, ensure the longitude and latitude you enter are in degrees, minutes, and seconds. If you’d rather enter longitude and latitude instead of a city, press “Back” on the keypad when prompted to enter time.
Align computerized telescope
After entering the requested details, the system will ask you which alignment method you want to use. As a beginner, choose “SkyAlign” for now.
Use the red dot finder to locate any bright object in the sky. The object can even be the moon or any bright planet.
Then slew or move the telescope left, right, up, and down till the red dot appears over the bright object. When this happens, hit “Enter” on your keypad.
The next thing you have to do is ensure the object is at the center of the field of view of your telescope. Looking through the eyepiece, ensure the object is centered and hit “Align” this time to complete your first alignment.
You’ll repeat this process again for two other bright objects. After the third alignment, the computer may take a few minutes to boot. If you’ve done the alignment well, you should get a “Match Confirmed” message on your keypad.
The SkyAlign alignment technology gives the telescope enough information to compute your location relative to the earth and other solar system objects.
So try as much as possible to do the alignment process with three bright celestial objects, preferably bright stars, located across different angles. Now that the alignment is complete, it’s time to put the computerized scope to use.
View the targets
On the keypad, there are letters or words on some numbers that you can press to view some targets. For example, “solar system” is inscribed on the number 1 keypad. You can tap that to view the planets and the moon. There’s also “Deep Sky” on keypad number 3.
To view a deep sky object in the Messier Catalog, click 3 from the keypad, then press 6 (“Scroll Up”) or 9 (“Scroll Down”) till you can see “Messier Catalog” on the pad. Press “Enter.”
If I want to view the number 42 object – the Orion Nebula – in the Messier Catalog, I’ll key in 0-4-2 and hit “Enter.”
The telescope will slew in the required directions and put the Orion Nebula at the center of your view. It’ll also continue to track the object to ensure it’s always at the center of your view.
If you’re in a “surprise me” mood, hit “Sky Tour” (number 5) on the keypad to see a series of the best night sky objects to see based on your location and time. Other options you can access on the NexStar+ computerized hand control include:
- Solar system (Number 1 on the keypad): To access the planets and the moon.
- Deep Sky (Number 3 on the keypad): To access deep sky objects, such as those in the New General Catalog and Caldwell Catalog. The catalogs contain deep sky objects, mostly galaxies, though.
- Stars (Number 2 on the keypad): To access the stars on the Smithsonian Astrophysical Observatory catalog.
I’d like to stress that an object being in the database doesn’t mean you can see it clearly from your telescope. Sometimes all you’ll get is a faint picture. Aside from environmental limitations, the telescope itself has limits.
The NexStar 130SLT's SkyAlign technology is its biggest advantage over manual telescopes. Instead of knowing specific star names, you simply point at any three bright objects and the mount calibrates itself, making it genuinely beginner-friendly.
Advantages of the Celestron NexStar 130 SLT telescope
The Celestron NexStar 130SLT comes with a lot of advantages, and some of them include
Low cost
It is an affordable telescope with a decent aperture, computerized hand control, and mount. There is no competition for it in that class. The telescope offers one of the best price-to-performance ratios I’ve seen.
Easy to use and set up
I like how it’s almost plug-and-play to set up the telescope. You don’t need any tools except if something is out of place during delivery and needs correcting. Otherwise, it’s easy to set up.
It’s also easy to use. SkyAlign may give you a few trips at first, but if you follow the steps outlined above, you should have no issues at all.
After spending a few moments with the controller, you will learn everything you need to know to control the telescope. It is a very intuitive and easily operated instrument.
Compact and portable
It only weighs 17 pounds, and you can even move it with one hand, except you’re a child.
You can also quickly separate the optical tube from the mount and put them in the car for transport to your favorite camp or dark sky site.
This makes the NexStar 130 SLT highly compact, portable, and convenient.
Quality mirror
The primary optical element is an aluminum-coated high-quality parabolic mirror. Some reflector telescopes come with a spherical mirror. Let me tell you, there’s a big difference between the two.
Many technical details are involved but know that scopes with spherical mirrors suffer from spherical aberration, while telescopes with parabolic mirrors can remove spherical aberrations. Spherical aberration means your images may be distorted depending on other conditions.
Parabolic mirrors also produce better-focused images than spherical mirrors. The former also has additional light gathering capabilities than the latter.
2″ Focuser
You can use 2″ eyepieces with the provided adapter. It is a unique feature in this class of telescope because many of them don’t have that option, and you can only use 1.25″ eyepieces.
The Nexstar 130SLT itself comes with 1.25” eyepieces. Upgrading to a 2” eyepiece will get you better wide-field views.
Dependable and holds collimation
The Celestron Nexstar 130 SLT telescope is a very durable telescope that will last forever if you take good care of it.
Many reflecting telescopes have a problem holding the collimation. Sometimes you have to collimate a few times at night, but this one will stay collimated for many nights.
Terrestrial viewing
Celestron notes that you can also use the telescope for “land-based” spotting. That is, you can use it as binoculars for bird watching and wildlife observations. In essence, the NexStar 130 SLT is a multipurpose scope.
That said, the position of the eyepiece means there will be a lot of work for your neck in finding the best angle to view earthly objects.
Good support
It is a Celestron, which means the support for this telescope is high-level (customer service, manuals, etc.).
Disadvantages of the Celestron NexStar 130 SLT telescope
The Celestron Nexstar 130 SLT telescope also comes with certain limitations. Here are some of them
Difficulty in replacing broken parts
For reasons unknown, it seems parts can be hard to come by. Perhaps it (over)confidence on Celestron’s side about the telescope’s durability (which I attest to).
I’ve not personally had to search for parts, but from conversations at some of our meetings, I’ve heard people ask around for broken parts like the holder tray.
Red dot finder not working
Some users reported that it is not working or will stop working after a while. But Celestron will promptly replace the faulty one, so there is no stress.
Alternatively, check my article: Red Dot Finder Not Working (Fixed!)
Not adequate for astrophotography
If you are planning to do astrophotography, this is not the telescope you want. However, you can still do simple planetary or lunar surface astrophotography (more on this later). It is just not suitable for deep-sky objects.
Single fork mount
The mount that comes with the NexStar SLT telescope uses a single fork. With a single fork, you cannot use the mount for other telescope tube assemblies that weigh above 11 pounds or 5kg.
It’s also something to be wary of when attaching accessories to the telescope.
Regular alignment every time it’s rebooted
You have to perform the three bright celestial objects’ alignment every time you turn on the telescope. The Nexstar SLT does not have the technology to resume from where it stopped.
Even a slight bump on the telescope can require realignment. This process can be annoying, but after like three reboots, the process should be swift for you.
Some parts look cheap
I know this comes with the territory of affordable telescopes, but for the price, I expected better than some of the plastic parts on the NexStar 130 SLT.
The battery cover is made of plastic. Same as the cover for the finderscope battery compartment. And I think the gripe I have with the plastic parts is that they look super cheap. It can be plastic and still look polished. I guess beggars can’t be choosers.
The plastic cover on the finderscope battery compartment makes it difficult to replace the battery.
What can you see with the Celestron NexStar 130 SLT?
I’ve said repeatedly that the NexStar 130 SLT works best for viewing fainter deep-sky objects. One of the things that makes this telescope better for deep-sky objects is its wide field of view. And, of course, the relatively large aperture size for more light-gathering power.
This is not to say that you can’t view the moon, planets, or brighter stars with this telescope. It only means you’ll get crispier and sharper images when viewing the former than the latter.
You can see a lot of the objects in the Messier Catalog, such as M11 (the Wild Duck Cluster), M42 (Orion Nebula), and M45 (the Pleiades or the Seven Sisters).
You can also see the Andromeda galaxy, star clusters, nebulae, globular clusters, and much more. That said, some galaxies and objects will only appear as a blurry blob.
I know you may be interested in which planets you can see, and I’ll address them all.
You can see Jupiter and some of the details on it clearly. You’ll see the cloud bands and observe their red spot. If you set your sights on Saturn, you’ll see its rings and the planet’s true color. You can see Mars with some detail, especially if it’s close to the Earth.
While you can also see Neptune, Uranus, Venus, and Mercury, they won’t appear more than colored disks in the sky, even at higher magnification.
In fact, to sight Uranus and Neptune, you need many conditions to align in your favor, including atmospheric turbulence and clear dark skies.
Of course, you can see the moon and the crates within.
Is the Celestron NexStar 130 SLT good for astrophotography?
Celestron NexStar 130 SLT is not suitable for deep sky astrophotography. There are two main problems. You will not be able to reach focus with the DSLR camera, and because of the Alt-Azimuth mount, you are limited to only 30-40s exposures.
But I have done it anyway.
I have modified my SkyWatcher model, which is the same telescope as Celestron NexStar 130 SLT, and I was successful. It is limiting but possible. You can take a nice picture of some bright deep sky objects. As an example, here is the Orion nebula I captured.
You can learn more about it here, and more pictures are available in my Reddit post.
However, you can absolutely do planetary or Moon astrophotography and video astronomy without modifying the telescope. All you need to do is to use a specialized astronomy camera or a simple webcam.
I have written an article on how to use a webcam with a telescope, so if you are interested, you can check it out.
Why equatorial mount are best for astrophotography
I mentioned that the Alt-Azimuth limits your ability to use the NexStar 130 SLT for astrophotography. This is because equatorial mounts are the best for astrophotography.
To take astronomy pictures, you need long-exposure imaging. During the process, any slight movement of the object would impact the quality of the image. The subject will appear distorted.
I’m sure you’re aware that the earth and other objects move. These movements are a problem during astrophotography. Furthermore, the earth and night objects do not move in a straight line but arced paths.
To get the best images, you need a mount that matches the earth’s movement, so there’s no difference in the object’s positioning.
That’s where equatorial mounts are different from Alt-Azimuth. As such, you can take long exposure images with equatorial mounts because they can track objects for longer periods than Alt-Azimuths.
Is the Celestron NexStar 130 SLT worth it?
Considering the features and performance against its price, I can unequivocally say that the Celestron NexStar 130 SLT is a fantastic telescope and a worthy investment, particularly for beginner astronomers.
If you’re looking for an astrophotography telescope, I’ve said that this telescope should not be one of your primary options. However, if you’re just a hobbyist astronomy observer, it fits most of your needs.
Also, if you travel a lot to campsites and dark sky sites, the NexStar 130 SLT is a great companion due to its portability and lightweight.
The computerized GoTo motorized tracking removes many hurdles for amateur astronomers. One of the things that trip beginners is how to find and track objects in the night sky.
Beginners can also download Celestron’s Starry Night app for free. You can use the app to learn more about the solar system and beyond. You can also learn how to plan for a viewing session.
So, if you fall into any of these categories, the Celestron NexStar 130 SLT is definitely worth it.
Takeaway: Celestron NexStar 130 SLT is an affordable computerized giant
I think that Celestron NexStar 130 SLT is a great telescope, and I also recommend it for beginners. It is very affordable and fun to use. It will show you almost everything in the night sky.
It’s not perfect, and trust me, no telescope is, even the premium top-of-the-range ones.
I have been using the telescope for a few years, and I was and am still very happy with it.
If this is the first telescope that you are considering buying, go for it. It is the cheapest computerized telescope with an aperture big enough to satisfy any hobbyist astronomer out there.
Don’t forget to subscribe to our newsletter where you’ll find the latest cosmic discoveries, expert stargazing tips, and exclusive subscriber deals. Embark on your cosmic journey if you haven’t already!
Read also:
Don't skip the two-star alignment step when using the computerized mount. A sloppy alignment causes GoTo pointing errors that compound throughout the session, making you think the system doesn't work when it just needs a careful initial setup.