DSLR Astrophotography on a Budget: Beginner's Guide
Last updated: March 27, 2026
🌌 Get Weekly Stargazing Tips
Join 900+ astronomers. No spam, just sky.
You can shoot impressive deep-sky astrophotos with a beginner DSLR and a basic telescope for under $800 total. The key is pairing a sturdy tracking mount with the right camera settings, a T-ring adapter, and free stacking software like DeepSkyStacker.
Key Takeaways
Budget astrophotography is achievable with a DSLR, tracking mount, and a modest refractor or reflector — total cost under $800.
The most critical investment is the tracking mount, not the telescope — a stable tracking platform transforms image quality.
Start with bright targets: Orion Nebula (M42), Andromeda Galaxy (M31), Pleiades — all forgiving for beginners.
Astrophotography with a DSLR camera involves capturing the night sky’s celestial wonders using the advanced features and flexibility that DSLRs offer. These cameras are well-suited for astrophotography due to their large sensors, which are capable of gathering more light than typical point-and-shoot cameras, thus providing clearer and more detailed images of stars, planets, and galaxies.
Users can manually adjust critical settings like exposure time, aperture, and ISO to suit the specific requirements of night sky photography. Long exposure times allow for capturing faint starlight and celestial phenomena while adjusting the ISO helps in balancing the need for light sensitivity without introducing excessive noise.
Furthermore, the ability to interchange lenses gives photographers the versatility to shoot wide-angle views of the Milky Way or zoom in for more detailed shots of specific celestial objects.
In this guide, we will unravel the mysteries of capturing stunning celestial images with the DSLR camera you may already own or can acquire without breaking the bank.
How to take astrophotography with a DSLR camera and telescope?
There are four stages to having clear and pristine astrophotos you can be proud of.
Choosing the right tools for the job including the right telescope and camera. For the telescope, a wide-angle scope is preferable. For the camera, a wide-angle camera lens (f/1.4 to 2.8) also makes the most sense.
Selecting the right environment and clear night sky. While you may not have the luxury of taking photos from a dark sky site, at the very least, ensure the DSLR astrophotography setup is stable. The stability of the whole setup depends on your mount and tripod. Always buy and use sturdy and stable tripods. Any slight vibrations can distort your photographs. A remote control camera also helps so that everything is hands-off.
Capturing the images. You can either use prime focus or an afocal method.
Post-processing. At this stage, you stack and edit the raw images you took.
What essential gear do I need for DSLR astrophotography?
Here’s a list of the fundamental equipment you’ll need:
A DSLR camera with manual settings
A digital single-lens reflex (DSLR) camera is the core of your astrophotography setup. Choose a model with manual settings, a large image sensor, and low noise performance for the best results. Full-frame cameras are often preferred for their superior low-light capabilities.
A telescope to magnify and gather light from distant celestial objects
This increased magnification allows for detailed imaging of planets, galaxies, nebulae, and other deep-space targets, revealing intricate features that may be challenging to capture with just a camera and lens. Telescopes also enable longer focal lengths, providing more flexibility in framing and composition.
The Celestron NexStar 130SLT telescope stands out as an excellent option for both beginners and experienced astronomers interested in astrophotography due to its computerized mount, sizable aperture, fast focal ratio, and the inclusion of quality accessories.
A GoTo mount system to find every target automatically
A GoTo mount system is highly regarded in astrophotography due to its precision tracking capabilities and automated object location, which are essential for capturing clear, long-exposure images of celestial bodies.
These mounts are user-friendly, offering ease of use for both beginners and experienced astronomers, and efficiently maximize imaging time by quickly finding and tracking targets.
Additionally, their compatibility with astrophotography software enhances the planning and control of imaging sessions, making them a preferred choice for astrophotographers seeking quality and convenience.
🔑 Key Point
The tracking mount is the single most important investment in your astrophotography setup. A $300 star tracker paired with a $200 used DSLR will produce far better results than a $500 camera on a fixed tripod. Prioritize tracking above all other gear.
A sturdy tripod to keep your camera steady during long exposure shots
A tripod acts as a reliable platform to prevent camera shaking, ensuring that stars and other subjects remain crisp and well-defined in the final photographs.
Additionally, its adjustability in terms of height and angle allows for precise framing and composition, making it an invaluable asset for photographers in various shooting conditions and terrains.
Ultimately, a robust tripod not only enhances the technical quality of images but also contributes to the comfort and ease of the photography process, reducing the risk of fatigue during extended shooting sessions.
How to connect a DSLR to the focuser?
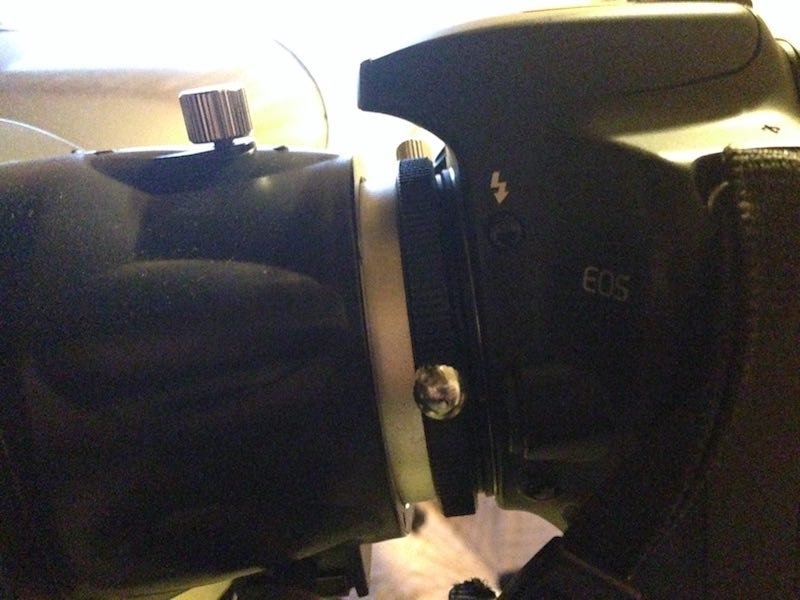
To connect a DSLR camera to a telescope for astrophotography, a T-Ring specific to the camera brand is required. This T-Ring attaches to the DSLR in place of the lens and then connects to the telescope’s focuser. While a standard T-Ring can be somewhat thick, potentially affecting focus and light capture, there are thinner options available that can mitigate these issues.
For instance, Ultra Thin T-Rings are designed to minimize the space between the camera and the telescope, thereby preserving the optical path’s integrity. By using such a T-Ring, one can ensure that the focuser does not extend too far into the telescope tube, thus avoiding potential issues with light loss or distortion.
This approach allows for a more efficient and effective connection between the DSLR camera and the telescope, essential for high-quality astrophotography.
💡 Pro Tip: Focusing
Use your camera's Live View at 10x magnification on a bright star to achieve precise focus. A Bahtinov mask placed over the telescope aperture creates diffraction spikes that make perfect focus unmistakable, even for beginners.
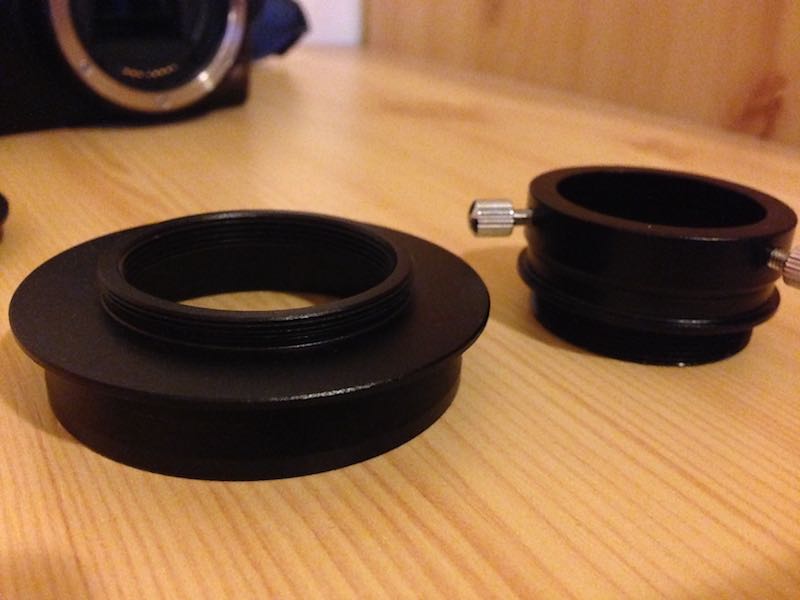
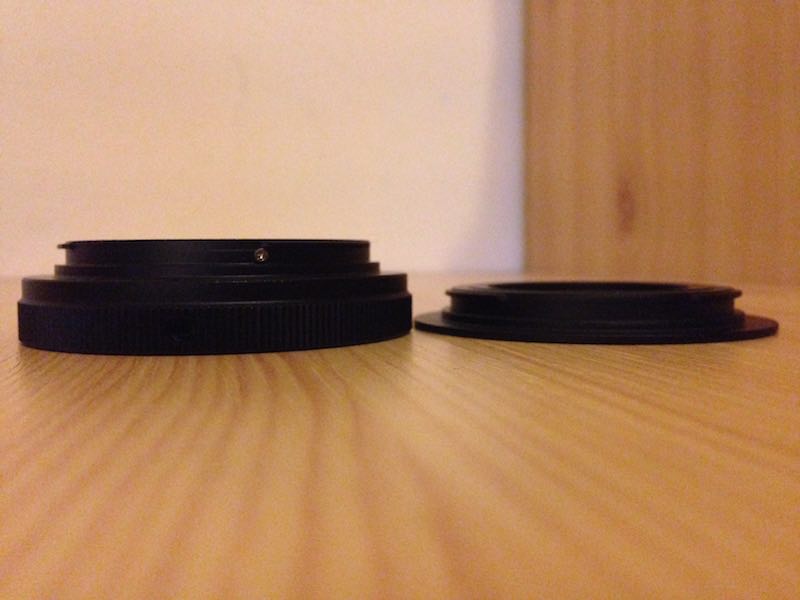
2 to 1.25 reduction
Standard T-Ring vs. Ultra Short T-Ring
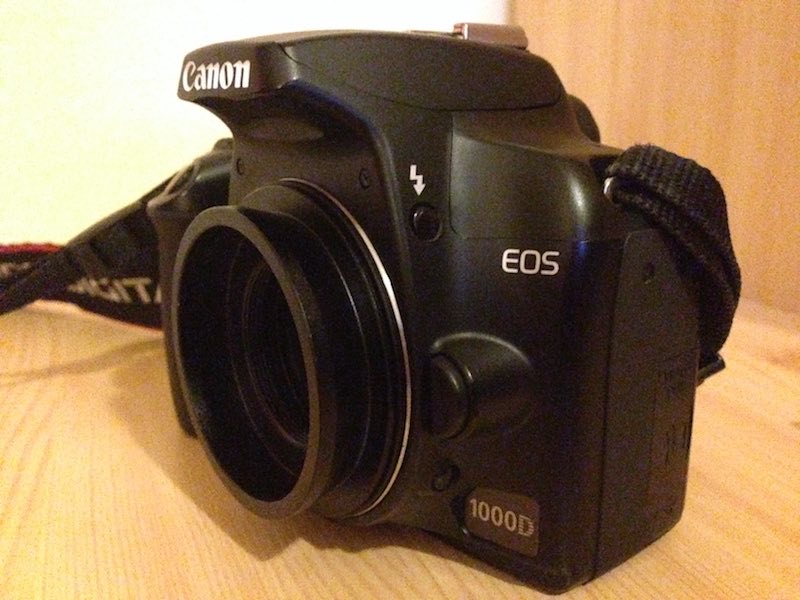
Canon EOS 1000D with Ultra Short T-RIng and 2 adapter
What are the recommended DSLR settings for astrophotography?
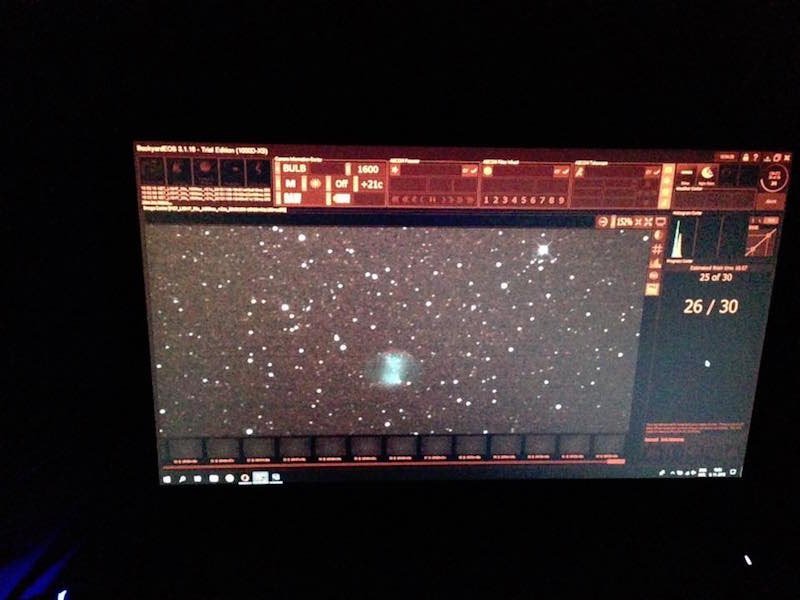
For astrophotography using a Canon 1000D or similar DSLR cameras, specific settings can enhance image quality. These settings can be adjusted based on experience and the specific requirements of the photography session.
Main DSLR settings
Camera Mode: Manual
Auto Cleaning: Enabled
Viewfinder Cap: Used during exposures
Shutter Speed: Set to ‘Bulb’, controlled with an interval timer
ISO: 1600
Image Quality: RAW
Red-Eye Reduction: Off
Review Time: Off
Auto Power-Off: Off
Auto Rotate: Off
LCD Display: Off/On between Shutter Display
Screen Color: 1
Live View: On
Live View Grid Display: On
Live View Metering Timer: 1 minute
Custom settings
Exposure Level Increments: 1/3 stop
Flash Synchronous Speed in Av Mode: Auto
Long Exposure Noise Reduction: Off
High ISO Speed Noise Reduction: Off
Auto Lighting Optimizer: Disabled
AF Assist Beam Firing: Disabled
AF During Live View Shooting: Disabled
Mirror Lockup: Disabled
Shutter/AE Lock Button: AE/AF, no AE lock
Set Button When Shooting: Menu Display
LCD Display When Powered On: Display
Add Original Decision Data: Off
⚠️ Common Mistake
Do NOT enable your camera's built-in Long Exposure Noise Reduction. It takes a second "dark frame" after every shot, doubling your capture time and making stacking far less efficient. Instead, take separate dark frames at the end of your session for calibration in DeepSkyStacker.
Exposure times for astrophotography
General Rule: Longer exposure times typically result in less noise.
Variable Factors: Ideal exposure time varies based on camera features, tracking accuracy, telescope optics, and the specific celestial object being imaged.
Tools: An astrophotography DSLR exposure calculator, like the one offered by OmniCalculator, can provide more accurate settings.
Which software applications are best for astrophotography?
Astrophotography requires specialized software for capturing, stacking, and processing images. Here’s a breakdown of these types and some recommended software:
Capturing software: To transfer images from the camera to the computer
Canon EOS Utility: A basic, free application for Canon cameras, suitable for beginners but limited in features for advanced astrophotography.
BackyardEOS: A more advanced option for Canon users (and a Nikon version available), offering extensive features like exposure plans, camera, and telescope control. It has a 30-day trial, followed by a choice of two paid licenses – Classic and Premium Editions.
Stacking software: To stack multiple RAW images to create a single, improved file
DeepSkyStacker is a completely free software. Initially, it may appear complex but is user-friendly with available online tutorials. It’s ideal for combining multiple exposures into one file.
Processing software: To fine-tune images and reveal hidden details
GIMP: A free option that is quite powerful for image processing.
Adobe Photoshop: A paid, well-known software offering advanced processing capabilities. Suitable for those looking for professional-grade results and who might already be familiar with Adobe products.
Takeaway: Enjoy astrophotography with DSRL
In conclusion, astrophotography with a DSLR camera offers both accessibility and the potential for capturing stunning celestial images.
Key points to remember include selecting the right equipment, such as the telescope and the appropriate DSLR camera with its settings. Additionally, understanding the importance of a T-Ring adapter for connecting the camera to the telescope and using specialized software for capturing, stacking, and processing images is crucial.
While this article provides a foundational understanding of the process, the journey into astrophotography is one of continuous learning and experimentation.
The images below, captured with these techniques, illustrate the initial results that can be achieved. They also demonstrate the promise of improved outcomes with more experience and longer exposure times.
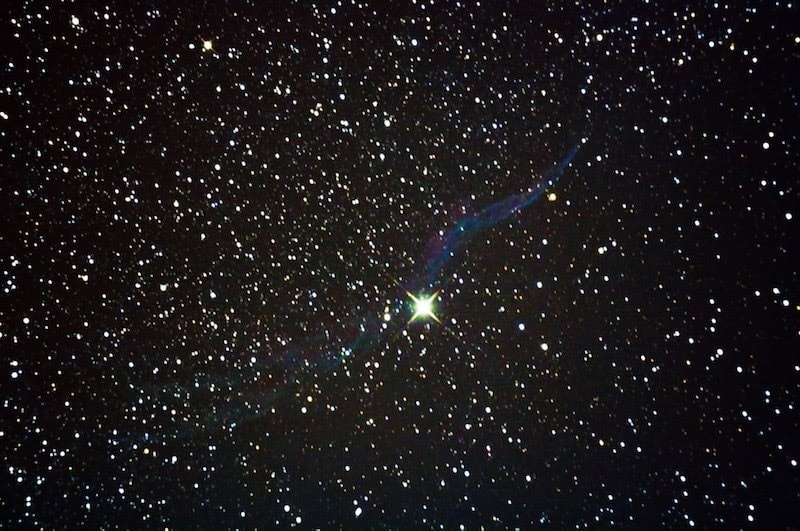
NGC 6960: The Witch’s Broom Nebula
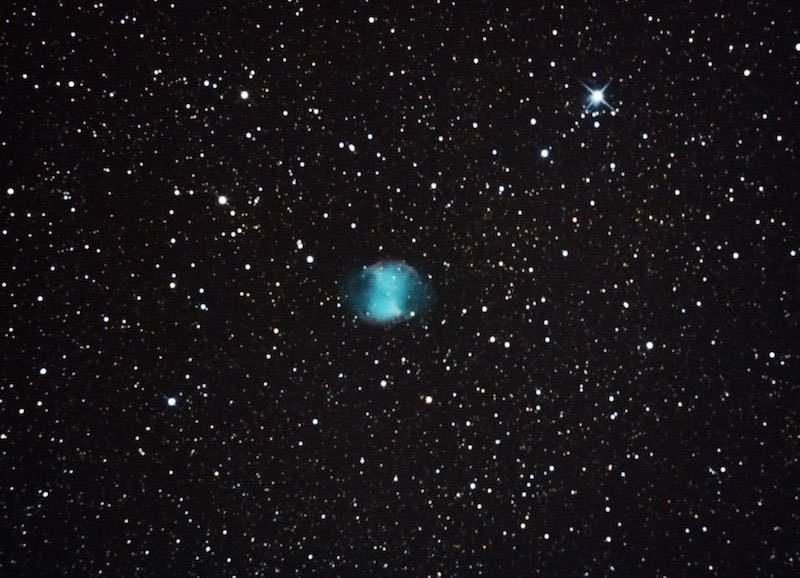
M27- Dumbbell Nebula
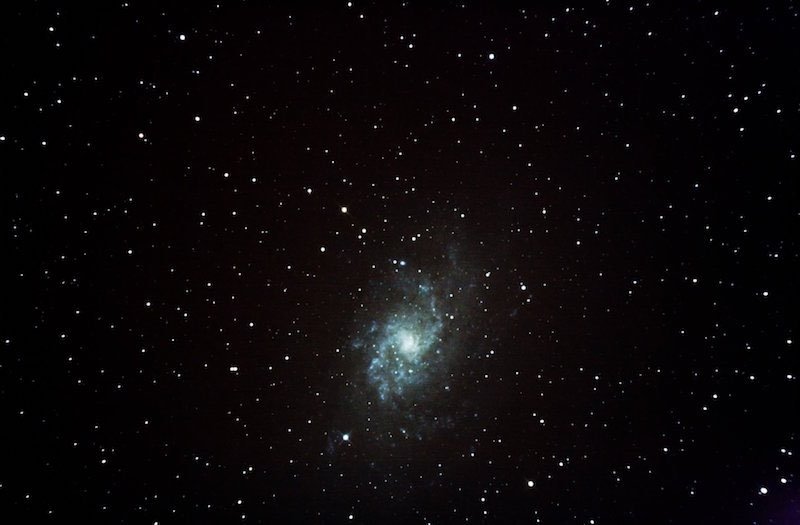
M33- Triangulum Galaxy
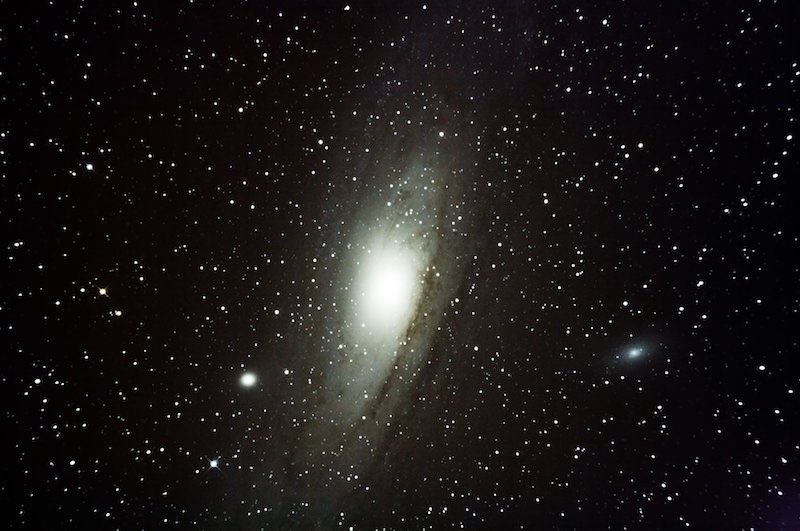
M31 Andromeda and its companions M32 and M110
❓ Frequently Asked Questions
Can I use any DSLR for astrophotography?
Most modern DSLRs work well for astrophotography. Canon and Nikon crop-sensor bodies like the Canon Rebel series or Nikon D3500 are popular budget choices. A full-spectrum modified camera captures more nebula detail, but a stock DSLR is a great starting point.
What is a T-ring adapter and do I need one?
A T-ring adapter connects your DSLR camera body to a telescope focuser, letting the telescope act as a telephoto lens. You need a camera-specific T-ring (Canon, Nikon, Sony, etc.) plus a T-adapter that fits your telescope's focuser diameter.
What DSLR settings should I use for astrophotography?
Start with ISO 800-1600, aperture wide open, and exposures of 30-120 seconds depending on your tracking mount. Use RAW format, turn off in-camera noise reduction, and use a remote shutter or 2-second timer to avoid camera shake.
Do I need a tracking mount for DSLR astrophotography?
A tracking mount is highly recommended for exposures longer than 15-30 seconds. Without tracking, stars trail across the image. An equatorial mount or star tracker like the Sky-Watcher Star Adventurer lets you take longer, sharper exposures.