- Understand moon phases for best shots - Quarter phases reveal craters and shadows; full moons wash out detail.
- Use low ISO (100-200) and fast shutter speeds - The moon is bright enough to avoid high-noise settings.
- Manual focus is essential - Auto-focus struggles with the dark sky; use live view to nail sharpness.
- Choose the right telescope - A refractor with 50x+ magnification is ideal for beginners.
🌌 Want More Stargazing Tips?
Join 900+ astronomers. Weekly sky guides, no spam.
If you’ve ever wondered how to photograph the moon with a telescope, you’re in the right place. In my years of experience, I’ve learned that it’s not just about having the right equipment. It’s about understanding the moon’s phases, knowing when to shoot, and mastering your camera settings.
I’m excited to share my tips and techniques with you. So, let’s embark on this astronomical journey together. It’s time to turn your moon gazing into a photographic masterpiece.
Understanding the Moon’s Phases
Gazing upon the moon, its mystery and grandeur leave me in awe. Yet capturing this ethereal beauty through a telescope lens is more than just pointing and shooting. An essential part of the process is understanding the moon’s phases.
A moon phase refers to the illumination of the Moon by the Sun. As the moon orbits around the Earth, the perspective of its lit surface changes. This shift leads to visible variations we refer to as phases.
Unraveling this mystery might sound daunting, but it’s not as complex as you think. The moon has eight distinct phases: New Moon, Waxing Crescent, First Quarter, Waxing Gibbous, Full Moon, Waning Gibbous, Last Quarter, and Waning Crescent.
Take the Full Moon phase for instance. It’s a spectacle, lighting the night sky with its complete illumination. Quite paradoxically, this isn’t the best phase for photography. The details, like craters and valleys, are lost in the high brightness, giving you a flat, lackluster image.
The First and Last Quarter phases, on the other hand, are ideal for capturing the moon. Half-illuminated, the interplay of light and shadow brings out the best features like depths of craters and peaks of lunar mountains.
Working with the moon’s phases can be game-changing in your pursuit of the perfect lunar snapshot. Knowing when and which phase to shoot can transform the familiar entity in the night sky into an otherworldly spectacle in your gallery. Here’s an easy-to-follow schedule of the moon’s cycle:
| Day | Phase | Best for Photography |
|---|---|---|
| 1 – 3 | New Moon | Not advisable due to lack of illumination |
| 4 – 7 | Waxing Crescent | Can provide interesting shots thanks to the partial illumination |
| 8 – 14 | First Quarter | Excellent for detailing |
| 15 – 21 | Waxing Gibbous | Good for detailing, less magnificent than Full Moon |
| 22 – 28 | Full Moon | Not advisable due to over-illumination |
| 29 – 14 | Waning Gibbous to Last Quarter | Excellent for detailing |
| 15 – 28 | Waning Crescent to New Moon | Not advisable due to lack of illumination |
Choosing the Right Equipment
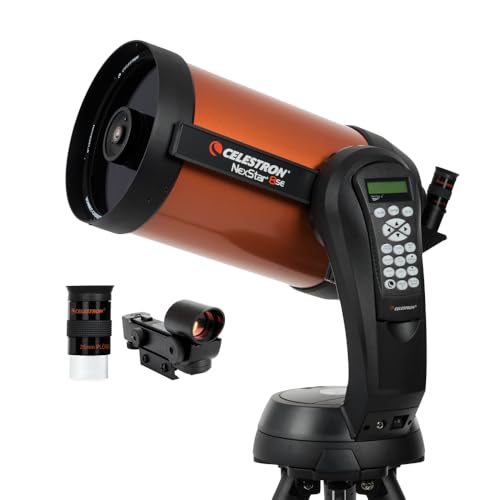
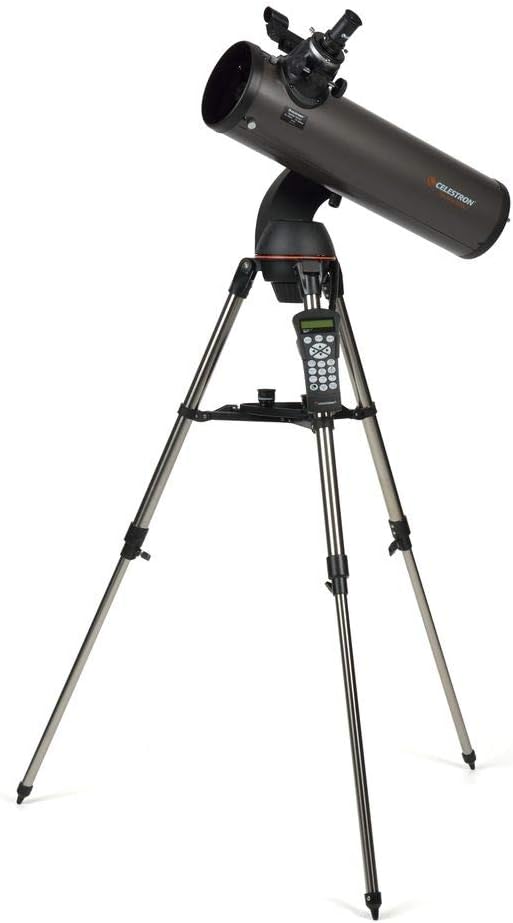
First off, let’s discuss the necessities. You’ll need a telescope; that’s a given. But make sure the telescope you choose has a high magnification rate. Magnification is crucial for capturing the granular details of the moon’s surface. A rate of around 50x or higher should suffice for moon photography.
You may wonder, “Which telescope is the best for moon photography?” My advice would be to go for a refracting telescope if you’re a beginner. Unlike reflecting telescopes, refracting telescopes are user-friendly, easier to handle, and typically come equipped with the necessary mounts and adapters.
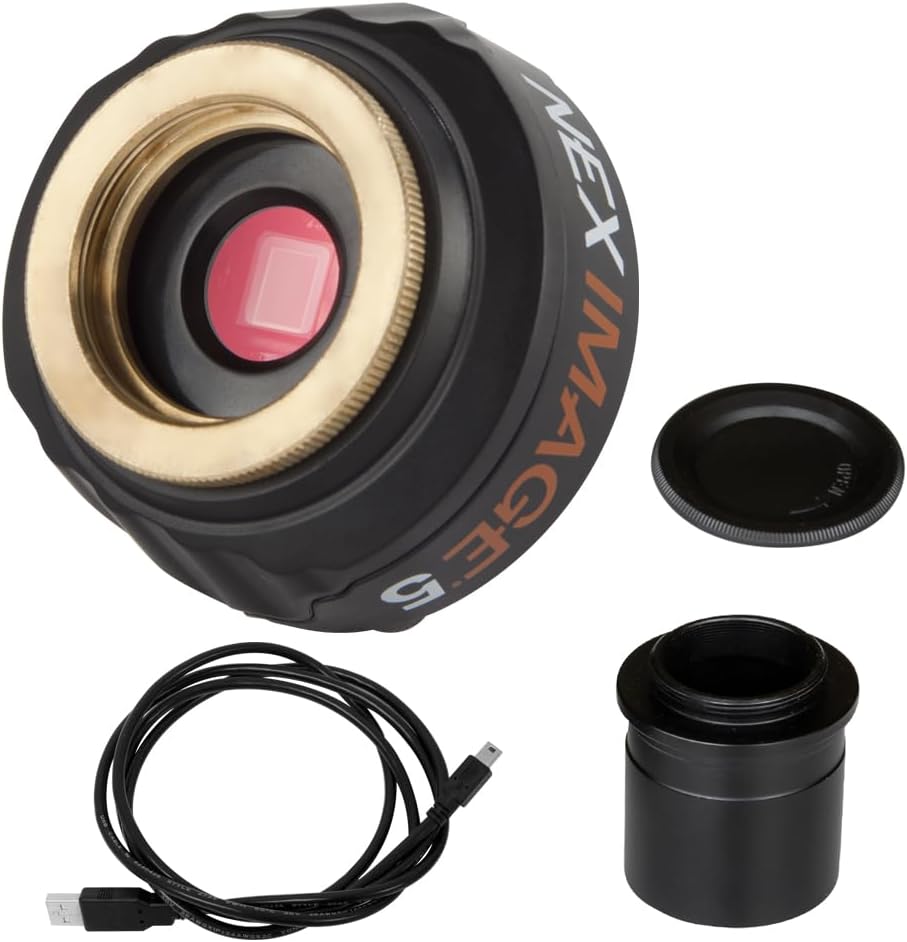
Let’s talk about the camera. A DSLR or a mirrorless camera is preferable. Both options offer flexibility in terms of settings and hold the capacity to capture the necessary detail. When choosing a camera, ensure it’s compatible with the telescope. A camera with a high dynamic range is optimal as it’ll effectively capture the bright and dark areas of the moon.
Another critical piece of equipment you’ll need is a T-ring adapter. The T-ring adapter connects the camera to the telescope acting as a bridge. Make sure to pick an adapter that suits your particular camera model.
Needless to mention but a sturdy tripod is absolutely important. You wouldn’t want vibrations causing blur in your photographs.
To make things easier, here’s the list of the recommended equipment for moon photography:
- Telescope with a magnification rate of 50x or above
- DSLR or mirrorless camera
- T-ring adapter suitable for your camera
- Sturdy tripod
Finding the Perfect Spot
Once you’ve got your professional-grade equipment ready for the big shoot, it’s time to scout out the best location. Now, it’s not just as simple as stepping out of your back door and setting up in the yard. This spot hunt involves much more.
Light pollution is a key factor when trying to achieve clear celestial shots. You’d be surprised how much city lights can interfere with your shoot. They sterilyze the view, making the image look flat. To skip this nuisance, you need to find a dark place, far from the city’s artificial lights. Here’s a pro tip: use an online light pollution map to help you locate the darkest areas near you.
Environment plays a crucial role in influencing the clarity of your moon pictures. Shooting in areas with fewer obstructions might reward you with the crispness that we photographer live for. So, if you can, avoid trees, buildings, and even mountains that might block your line of sight to the moon.
Finally, there’s the most critical yet often overlooked piece of this puzzle: comfort. You’re likely going to spend hours on end in this selected spot. So you want to make sure it has ample space for your equipment, it’s safe, and has nearby facilities.
Here’s a bullet-point list to summarize these factors:
- Light Pollution
- Environmental obstructions
- Weather conditions
- Comfort and convenience
Remember, photography is all about patience, even for a professional like me. Despite all the preparation, there will be nights where you can’t get the perfect shot. Don’t despair. Keep going, keep trying, there will be the night where the struggle pays off, delivering that unbelievable image we all aim for.
🔭 Want our top telescope picks for 2026?
Join 960+ astronomers getting weekly gear reviews, deals, and stargazing tips. Free.
Setting Up Your Telescope
After you’ve chosen the right equipment and identified an ideal location, it’s time to set up your telescope for moon photography. There’s a common misconception that setting up a telescope requires a high level of technical expertise. However, anyone can master this process with a bit of practice.
The first important step is ensuring that your telescope is balanced. An unbalanced telescope can lead to shaky images and cause damage to your equipment. Start by placing the telescope on a sturdy, level surface. Then, attach your camera using the T-ring adapter. Adjust the counterweights until the telescope is balanced.
Ensure the Telescope is Aligned
The next step is aligning the telescope. If the alignment is off, you’ll experience difficulty locating the moon. There are a few methods for aligning a telescope including the two-star method and the North Star Polar alignment. As a beginner, you’ll likely find the two-star method easiest to use.
To align your telescope, point it towards the moon and focus your camera. You’ll need to adjust the settings on your camera to capture detailed and clear images. Remember, it’s better to underexpose rather than overexpose when photographing the moon due to its bright surface.
Last Checks Before Shooting
Finally, before starting your shoot, verify that your tripod is sturdy to prevent any unwanted vibrations. Check for any loose screws or unstable legs. A strong wind, even subtle ground movements, might be enough to disturb your equipment.
Now that your telescope is beautifully set up, you’re ready to dive into the fascinating world of moon photography. The next section of this guide will cover tips and tricks related to shooting and post-processing. With patience and persistence, soon you’ll be capturing images of the moon that rival those found in astronomy magazines.
Mastering Your Camera Settings
Setting your camera right is a critical element of moon photography. It’s not just snapping a picture; it’s about getting the maximum detail and clarity. Understanding your camera’s settings is halfway through success.
Secondary to the setup of your telescope is the configuration of your camera settings. Cameras allow us to manipulate three major settings: ISO, shutter speed, and aperture. We’ll delve into these elements and how they beautifully conspire to capture the perfect moon shot.
The ISO setting dictates your camera’s sensitivity to light. Lower ISO values, usually in the range of 100-200, are ideal for moon photography. The moon is a bright object, so a less sensitive setting is usually adequate. A high ISO setting might render an over-exposed, grainy image.
Shutter speed is the measure of how long your camera’s shutter remains open. It’s also proportional to the amount of light that hits the sensor. Considering the moon is a bright object and you’re using a low ISO setting, you can afford a faster shutter speed from 1/125 to 1/250 sec. Faster speeds reduce the chance of blurriness and capture crisper details.
Aperture, often denoted by “f/”, is the opening in your camera lens through which light enters. A smaller f-number translates to a larger opening, letting in more light. However, a larger f-number is preferred for moon photography. Somewhere between f/8 and f/11 will yield sharp images.
Different challenging situations require various camera settings. In the case of moon photography, lower ISO, faster shutter speed, and a mid-range aperture can work well in unison to offer a remarkable final image.
Don’t be afraid to experiment a bit with these settings. As you experiment, you’ll gain more familiarity with your camera and refine your ability to capture the moon in its full splendor. Remember, while these settings provide a good starting point, there’s no single perfect setting for every situation.
Tips for Achieving Sharp Focus
Now that we’ve got a good handle on manipulating our camera settings, let’s delve into another critical aspect of moon photography – achieving sharp focus. If you’re a seasoned photographer, you’ll know that getting in focus can make or break your shot. So, how exactly can we nail that crisp, crystal clear image of our lunar muse?
First thing’s first, manual focus is king in moon photography. Why so? Auto focus tends to get confused by the dark night sky and may not zero in on the moon as you’d like. By turning your lens to manual, you’re in control. No worries if you’re not familiar with it yet, it’s a skill that comes with practice.
Next, let’s talk about a technique I find really effective – live view focusing. With today’s technology, most DSLR and mirrorless cameras come with this nifty feature. Here’s how it works: switch to live view mode, zoom in to the moon on your screen, and manually adjust your lens until the moon looks as sharp as can be. It might take a few tries but trust me, the payoff is worth it.
Finally, don’t forget to utilize your camera’s focus peaking option, if it has one. This feature highlights the areas of your photo that are in sharp focus. Often displayed in bright colors against the night sky, it’s a helpful tool for visualizing exactly what’s in focus and what’s not.
Let’s summarize these tips in a table for easy reference:
| Tip | Description |
|---|---|
| Manual focus | Provides better control in moon photography by eliminating auto focus issues |
| Live view focusing | Enables you to zoom in and manually adjust focus for sharper images |
| Focus peaking | Highlights sharp focus areas, assisting in visual confirmation |
It’s important to note, every camera and photographer are different. What works for one may not work for all. I encourage you to try, experiment, and find what methods work best for you. By incorporating these techniques, you’re one step closer to capturing that breathtaking shot of the moon.
The Importance of Timing
When it comes to capturing breathtaking photos of the moon with a telescope, timing is everything. It’s not just about randomly pointing your camera to the sky and hoping for the best, no. Getting the perfect moon shot requires careful planning around when best to capture the celestial body.
One thing that could make a world of difference is the moon phase. The full moon phase, while visually stunning, might not be the best time to capture detailed images. The bright glow of a full moon can actually wash out some of the more intricate details of the lunar surface. Meanwhile, the quarter moon phase, with its contrasting light and dark regions, can help bring out the moon’s craters, valleys, and mountains. Keeping an eye on the moon phase calendar can go a long way in planning your shoot.
The timing of your shot also depends heavily on the position of the moon in the sky. As the moon moves across the sky, the position and intensity of the light hitting it changes, and this can drastically affect how the moon appears in your photograph. By being mindful of the moon’s local rise and set times as well as the moon’s elevation in the sky, you can harness these changes to create dynamic and visually striking images.
Another point to note revolves around the weather and atmospheric conditions. A clear and dry night can have a significant impact on the quality of your moon photograph. Cloud cover, high humidity, or unstable atmospheric conditions can all potentially obstruct or blur the moon’s definition, which doesn’t bode well for a spellbinding lunar photograph. Before setting up your equipment, ensure to check local weather forecasts and make use of clear, dry nights whenever possible.
| Factor | Details |
|---|---|
| Moon Phase | Quarter phases highlight lunar details; full moon can wash out details |
| Position in Sky | Moon’s elevation, rise, and set times affect light intensity and angle |
| Weather & Atmospheric Conditions | Aim for clear, dry nights with minimum humidity and atmospheric disturbance |
As you forge ahead with your lunar photography journey, stay patient, and remember: preparation is key. As with any skill, practice makes perfect.
Understanding Exposure and ISO
Exposure and ISO are two crucial aspects I can’t ignore when photographing the moon. When it comes to exposure, I find that I have to adjust it based on the moon’s phase and the surrounding atmospheric conditions.
In a full moon, I have to use a faster shutter speed to ensure the details of the moon aren’t washed out by the light. An excessively bright moon might result in my shot appearing flat and devoid of the moon’s unique topography.
However, during a quarter moon, I try to expose longer to bring out the natural shadows and craters on the moon’s surface. This careful adjustment lets me play with the balance between shadows and highlights, revealing the moon’s texture.
Acquiring the right ISO settings is just as crucial. High ISO settings increase the sensor’s sensitivity to light, but also introduce more noise to the image. I usually start with a low ISO, around 100-200, as it offers a cleaner image with lesser digital noise.
If I’m shooting in darker conditions or want to freeze the moon’s motion, I might consider increasing the ISO. Balancing the ISO with your shutter speed and aperture is integral in lunar photography.
I’d like to provide a brief table below to further clarify how these elements are inter-related:
| Moon Phase | Exposure | ISO |
|---|---|---|
| Full Moon | Faster Shutter Speed | Low |
| Quarter Moon | Longer Exposure | Depends on lighting |
Understanding exposure and ISO can make a significant difference in your lunar captures. The right balance of these settings will ensure you have a sharp, clear, and crisply detailed moon. Remember, practice and consistency are your best friends in mastering these aspects.
It may take some time and numerous trial and error shots, yet slowly but surely, I found improvement in my moon shots.
Dealing with Challenges and Limitations
Photographing the moon with a telescope isn’t a walk in the park. I’ve encountered numerous challenges along my journey and I’ve realized there are certain limitations that come with the territory.
Atmospheric turbulence, known among astrophotographers as “seeing,” can be a significant stumbling block. This can cause the moon’s image to wobble or appear blurry. Under these conditions, you’ll need to be patient and wait for a moment with better clarity, or “good seeing”. Trust me, that perfect shot is worth the wait.
Low light is another typical challenge, especially during the moon’s crescent and gibbous phases. Even with the right equipment, obtaining a clear, sharp image can be tricky. Here, applying the correct ISO and exposure settings previously discussed becomes ever so important. Don’t be afraid to experiment, as the ‘perfect’ settings can vary based on many factors.
You’ll also run into equipment limitations. While a telescope provides remarkable magnification, it won’t necessarily capture a broad field of view. If you’re aiming for a shot of the moon with landscape features, consider using a camera with a wide-angle lens.
Finally, it’s crucial to acknowledge the steep learning curve. Don’t expect your shots to look like NASA’s in the beginning. Practice consistently and be diligent in learning how each setting impacts your final image. Mistakes are part of the process, believe me. They offer valuable lessons that will make you a better lunar photographer.
Remember: the moon isn’t going anywhere. You’ve got all the time in the world to perfect your photo-taking skills. With patience, practice, and persistence, you’ll surmount these challenges and limitations, get that stunning moon photograph, and probably inspire someone else along the way.
Capturing the Moon’s Beauty
When it comes to capturing the Moon’s beauty, it’s all about patience, perseverance, and a little bit of technical know-how. While challenges like atmospheric turbulence, low light conditions, and equipment limitations are common, they aren’t insurmountable.
I always find it helpful to test my settings before taking the final shot. I usually start experimenting with lower settings, somewhere around ISO 100 and an exposure time of about 1/125s. This way, I can avoid the risk of overexposing the image. The moon isn’t just a bright object in a dark sky! Under the right conditions, it’s a showcase of intricate craters and textures.
Let’s talk about light pollution. It’s one of the most annoying hurdles for any astrophotographer. A high degree of luminance in the night sky can overshadow the Moon’s subtle details. That’s why I suggest heading out to a dark location away from city lights if you’re able. Your photos will greatly benefit from it.
Among the most useful tools in my lunar photography arsenal is the Moony 11 Rule. This little-known principle is a modification to the well-known Sunny 16 Rule and could be just what you need to get the perfect lunar shot.
Use a shutter speed equivalent to the inverse of your ISO and adjust the aperture based on the phase of the moon. Keep in mind; these settings are a starting point and not a guarantee for perfect images. Each scenario may require slight tweaks, depending on your specific conditions and equipment.
Understandably, each lunar photography expedition is a learning process. It takes time, practice, and unwavering diligence for successful shots. So, get out there, point your lens towards the sky, and start refining your technique. There’s nothing quite like the satisfaction of capturing the moon’s grandeur in its full glory.
Conclusion
I’ve shared my insights on moon photography with a telescope, tackling common challenges like atmospheric turbulence and equipment limitations. We’ve delved into the significance of ISO and exposure settings and the need for patience and practice. I’ve offered tips to capture the moon’s beauty, including avoiding light pollution and applying the Moony 11 Rule.
It’s not an overnight skill, it takes time to master. So don’t get disheartened if your initial shots aren’t perfect. Keep at it, refine your technique, and soon you’ll be capturing the moon in all its glory. The night sky’s the limit!
Frequently Asked Questions
What challenges might I face when photographing the moon with a telescope?
Photographing the moon presents various challenges such as atmospheric turbulence, low light conditions, and equipment limitations.
What should be my ISO and exposure settings to photograph the moon?
Correct ISO and exposure settings are imperative for capturing moon photos. However, the article does not specify exact numbers as it depends on several factors including the condition of the sky and your equipment.
Are there any tips to capture the best shot of the moon?
Yes, testing settings, avoiding light pollution, and using the Moony 11 Rule are helpful strategies to capture the moon’s beauty.