- Design around your telescope - the mount type determines your observatory layout and pier placement.
- Roll-off roofs are easier to build than domes and provide wider sky access at lower cost.
- Technology integration - computerized mounts, autoguiders, and remote operation software can automate your sessions.
- Comfort matters - include seating, red lighting, and power outlets for long observing nights.
🌌 Want More Stargazing Tips?
Join 900+ astronomers. Weekly sky guides, no spam.
Building a home observatory is a dream for many amateur astronomers. With the right ideas and planning, you can create a personal space dedicated to exploring the cosmos from your own backyard. This guide covers everything from location selection to technology integration.
Choosing the Right Location
When embarking on the journey to build your own home observatory, the first hurdle you’ll face is choosing the perfect location. It might seem obvious to choose the highest point in your backyard. Still, there’s more to consider when picking out the ideal stargazing spot.
Light pollution is a bitter enemy for astronomers. It’s crucial to select a location with minimal artificial light, granting you a clear, unimpeded view of the night sky. Secondly, consider the surrounding environment, particularly tall trees or buildings that might obstruct your view.
Remember, the aim isn’t just to get a casual glimpse of the stars. You’re building an observatory to enhance your view of celestial bodies, so seek out a vantage point that offers the widest possible view of the sky.
Physical space is another key factor. Ensure your chosen area is spacious enough to accommodate whatever structure you plan to build. In case you’re thinking about an opulent observatory with space for several telescopes or, a cozy nook with just one telescope, measurements are crucial. For instance, a dome observatory requires a diameter of at least 6 feet.
Here’s a brief overview of the factors to consider when choosing a location for your home observatory:
| Factors to Consider | Description |
|---|---|
| Light pollution | Choose a dark spot with minimal artificial light |
| Surrounding environment | Avoid tall trees, buildings, or any other potential obstructions |
| Space | Ensure the area is spacious enough for your structure |
| View | Site should provide the widest possible view of the sky |
Don’t rush this step. Think about it, research, and possibly check out a few successful home observatories if accessible. Each choice you make in this phase can significantly impact the effectiveness and enjoyment of your final build.
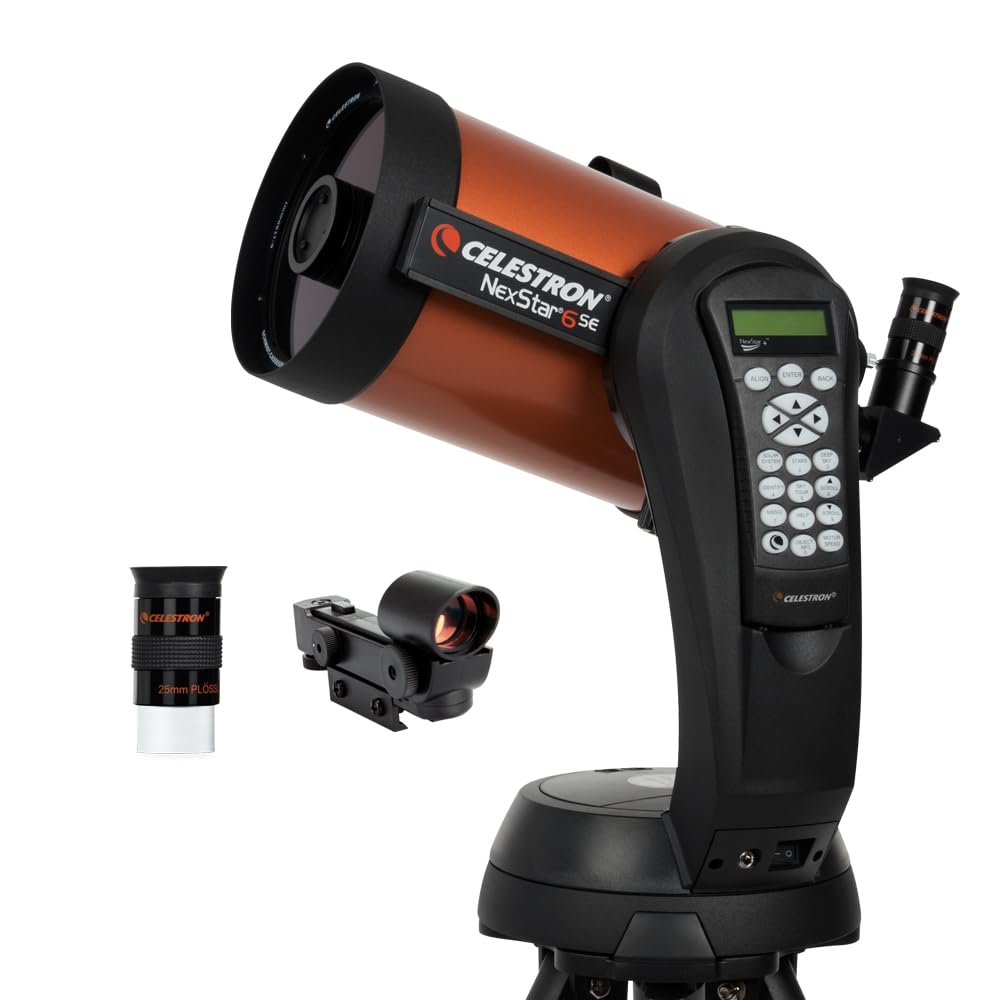
Selecting the Telescope
After ensuring you’ve got the perfect location for your home observatory, the next big step is selecting the appropriate telescope. This step is crucial because the type of telescope you choose will have a significant impact on what you can see and how well you can see it. There are numerous variables to consider, which can sometimes make this task seem daunting. However, by understanding what to look for and keeping your specific needs in mind, you’ll be able to make the right choice.
Telescopes come in all shapes and sizes, with a range of capabilities and price points. The first thing you should consider is what you wish to observe. Are you more interested in the planets within our solar system, or are you fascinated by distant galaxies and nebulae? This will guide your decision in terms of telescope power.
The second key point to consider is your budget. Certain high-end models come loaded with advanced features like computerized tracking and high-powered optics, but these may not be necessary for beginners or casual viewers. Don’t fall into the trap of buying the most expensive option hoping that it will be the best.
Telescope types typically fall into three categories:
- Refractor telescopes use lenses to bring light to a point to form an image. These are great for observing the moon or close planets.
- Reflector telescopes use mirrors instead of lenses, providing clear images of distant objects without color distortion.
- Catadioptric or compound telescopes combine lenses and mirrors to offer the best of both worlds.
Take note of the benefits and drawbacks of each type:
| Telescope Type | Benefits | Drawbacks |
|---|---|---|
| Refractor | Great for close viewing, excellent image quality, low maintenance | More expensive, not ideal for distant objects |
| Reflector | Affordable, great for viewing distant objects | Requires frequent alignment, images may appear upside down |
| Catadioptric | Versatile, during both day and night | Higher cost, heavier than other types |
Remember, your telescope selection should ultimately be based on your individual needs and interests. I suggest spending time to research and consider your options before purchasing. This way, you’ll ensure that your home observatory is equipped with the right tool for your stargazing ventures.
Setting up the Observatory
Having chosen the perfect telescope, the next big step is setting up the observatory. With the right planning and execution, you’ll find the process to be as rewarding as the star gazing itself.
The observatory’s location is the first thing to consider. A clear view of the night sky is essential. Avoid places with heavy artificial light pollution as this can limit your view of the cosmos. Be sure to choose a location with a wide and unobstructed view of the firmament.
Once the location is selected, think about the kind of observatory structure that suits you best. A stationary, permanent-structure observatory might be ideal for some: it’s always ready for a viewing session, with all equipment properly aligned. However, it’s pricier than the other option, a mobile observatory. A mobile setup allows you flexibility. You can move your gear around to capture the best views but it would require regular re-alignment of equipment.
When it comes to setting up the telescope, ensure it’s mounted on a sturdy and stable base. This helps to minimize vibrations and keeps your view of the stars sharp and clear. Additionally, aligning your telescope accurately with celestial North (or South in the Southern Hemisphere), also known as polar alignment, is mandatory for smooth tracking of celestial bodies across the sky.
Next, you need to protect your equipment. Invest in dust covers and caps for your telescope’s lenses and mirrors. In the case of an open-air observatory, consider how to weatherproof your setup. You might need to invest in additional equipment covers or even a small shed or custom housing to keep everything protected.
Last but not least, make sure you have comfortable seating. Those long hours under the stars will be much more enjoyable if you’re sitting comfortably. Consider an adjustable chair that can accommodate your various positions as you scan the skies.
Remember, building a home observatory is a journey, not a destination. It’s about constant learning, fine-tuning, and adjusting according to your observations and experiences.
🔭 Want our top telescope picks for 2026?
Join 960+ astronomers getting weekly gear reviews, deals, and stargazing tips. Free.
Incorporating Technology
No observatory, not even a home one, is complete without weaving in sophisticated technology that helps bring the universe closer to you. Now, let’s delve into a few ways you can leverage modern technology to enhance your stargazing experience.
First off, toss aside star charts and adopt astronomy software for your laptop or even mobile devices. There are numerous free, beginner-friendly applications, such as Stellarium or SkySafari, that can help you identify constellations, plan your observations, track celestial bodies, and much more. You can also opt for more advanced software if you’re interested in astrophotography or other specific activities.
Secondly, consider investing in a “GoTo” computerized mount. Such mounts can automatically point your telescope towards the celestial body you want to observe, saving you from manual searching and tracing. Not just this, such mounts also track celestial bodies as they move across the sky, giving you an extended view.
And of course, you want to capture the unparalleled beauty and wonders you’ll gaze upon. Hence, getting into astrophotography can be a logical progression. This will require additional equipment, including a suitable DSLR or CCD camera capable of long-exposure photography, and possibly a telescope designed for astrophotography.
Lastly, voicing a lesser-known tool, a weather station can prove handy if your surveillance schedule is flexible or if you are particularly keen on witnessing some phenomenon, like a passing comet or meteor shower. A weather station will give you forecast details, letting you plan your observation sessions wisely. Additionally, add-ons like wind speed and direction anemometers can safeguard your expensive telescope from unpredicted weather changes.
Don’t forget, integrating technology is meant to aid your exploration, not complicate it. Choose your tech gear wisely. Off-the-shelf solutions work fine for most, but tailor-made tech equipment can significantly elevate your experience. Exploit these advancements to their fullest to make the sky not so far away. Speaking of tailoring, our next section will talk about customized eyepieces for your telescope. But, let’s leave that for another discussion.

Enhancing the Viewing Experience
Stepping up my game in stargazing was a journey that involved leveraging the modern tools at my disposal. Technological advancement, in this respect, has been a game-changer. It’s an era where astronomy software on laptops and mobile devices can identify constellations, plan observations, and even track celestial bodies.
I found a variety of these software options available, ranging from beginner to advanced levels. Some of the most popular options include:
- Stellarium
- Celestia
- SkySafari
These applications offer a plethora of features helpful for stargazers. They have interactive sky charts, detailed information about celestial bodies, and some even include 3D models of the solar system.
Investing in a “GoTo” computerized mount was another savvy upgrade to the stargazing experience. It automatically points the telescope towards desired celestial bodies and tracks their movement. With the push of a button, you’re brought face-to-face with your selected celestial object!
Astrophotography is another domain that has been revolutionized by technology. With the right camera and a decent telescope, you can capture stunning images of celestial events right from your backyard, immortalizing the beauty of the cosmos.
Furthermore, I found using a weather station to be a valuable asset. It allowed me to plan observation sessions wisely, taking into account factors like humidity, temperature, and cloud cover.
Choosing the right gear and tailoring it to individual needs plays a significant role in enhancing the viewing experience. Embrace the capability of technology, and the universe is yours to explore.
So, we’ve explored the exciting world of home observatories. We’ve seen how technology can elevate your stargazing experience. With astronomy software, you’re not just observing; you’re identifying constellations, planning observations, and tracking celestial bodies. A GoTo computerized mount can be your personal guide to the cosmos, while astrophotography offers a chance to capture the beauty of the universe. A weather station isn’t just practical; it’s a smart way to plan your stargazing sessions.
But remember, the key is to choose the right gear that suits your needs. Here’s to clear skies and happy stargazing!